
Skills GameOn SDK for Node.js

Note: This public beta release of the Skills GameOn SDK includes the documentation, SDK code and sample code. Please note that we may improve or change the Skills GameOn SDK as we receive feedback and iterate on the feature.
The Skills GameOn SDK for Node.js provides easy access to Amazon GameOn and creates higher-level methods, utilities, and examples that simplify the integration of GameOn features, like leaderboards, with Alexa skills.
Amazon GameOn
Amazon GameOn is a set of flexible APIs that allow you to build cross-platform competitions into your games that drive engagement. In addition to leaderboards, you have an easy tool to strengthen your fanbase with leaderboards and leagues, awarding in-game prizes, and enabling streamers to play with their followers with a simple click. To learn more, see Amazon GameOn.
License
The Skills GameOn SDK and GameOn SDK packages are licensed under the Apache License, Version 2.0. The samples are licensed separately under the Amazon Software License.
GameOn Pricing
Alexa skill developers who publish an Alexa skill using the Skills GameOn SDK (or calling the GameOn service via other means) during the beta period will be eligible to receive free plays for usage within the Alexa skill. To qualify for this offer, click here to learn more.
Packages and Samples
Packages
- GameOn SDK - A dependency free Node.js compatible API client, generated from the GameOn Swagger source with coverage of all the non-Admin API methods.
- Skills GameOn SDK - Common features that Alexa skill developers may want to leverage:
- Player-focused convenience methods:
#initializeNewPlayer#refreshPlayerSession#enterTournamentForPlayer#submitScoreForPlayer- And more!
- Name generator - for when you want to assign random names to players.
- Secrets management for deployment on AWS Lambda.
- Avatar generator, for a quick way to pre-create unique avatars for players.
- APL (Alexa Presentation Language) - example templates and helper methods to get you started with visually displaying a leaderboard.
- Player-focused convenience methods:
Sample Skills
Word Word - A sample skill that showcases daily tournaments and many of the other above features. The Word Word skill is live, so you can enable it on your Alexa devices and play it today. More information about the skill is also on the Alexa Skills Store.
Word Word Lite - A code sample inspired by the live 'Word Word' skill. It leverages the Skills GameOn SDK as in the original skill but has a modified game loop and does not include the production audio assets. The code sample can be found in in the
samples/word-word-litedirectory of this repository.
Package Versions
| Package | NPM |
|---|---|
| @alexa-games/gameon-sdk |   |
| @alexa-games/skills-gameon-sdk |   |
Contributing
To contribute to the Skills GameOn SDK for Node.js, checkout out the development section below and then the Skills GameOn SDK for Node.js contribution guidelines.
Releases
New Skills GameOn SDK for Node.js versions are released via the GitHub repository releases page. A history of changes is recorded in our changelog.
Contact
You can get in touch with the Skills GameOn SDK for Node.js community in the following ways:
- Email the maintainers listed under the Core section in the credits page.
When communicating within the Skills GameOn SDK community, please mind our code of conduct.
Getting Started
Prerequisites
To get started, you will need to create an AWS account, create an Amazon Developer account, register a game with GameOn, retrieve your Public API key, and install the Skills GameOn SDK.
Setting up GameOn
Create an AWS account
Create your free AWS account here. If you already have an AWS account, you can skip this step.
Retrieve your AWS account ID
Take note of your AWS account ID for use with GameOn. Your account ID will be a 12-digit number. For more information see Finding Your AWS ID.
Create an Amazon Developer Console
Create your free Amazon Developer account here. If you already have an Amazon Developer account, you can sign in instead.
Register Your Game
To register your game, go to GameOn console, click Get API Keys or Register New Game, and follow the prompts. You will need your AWS account id in this step.
NOTE: Amazon GameOn is a stand-alone service. The Developer Name and Game Title fields can be arbitrary; they do not need to match anything related to your AWS or ASK setups.
Retrieve Your Public API Key
After registering your game, you will gain access to your respective GameOn Public API Key. Save this string for later use when setting up the Skills GameOn client.
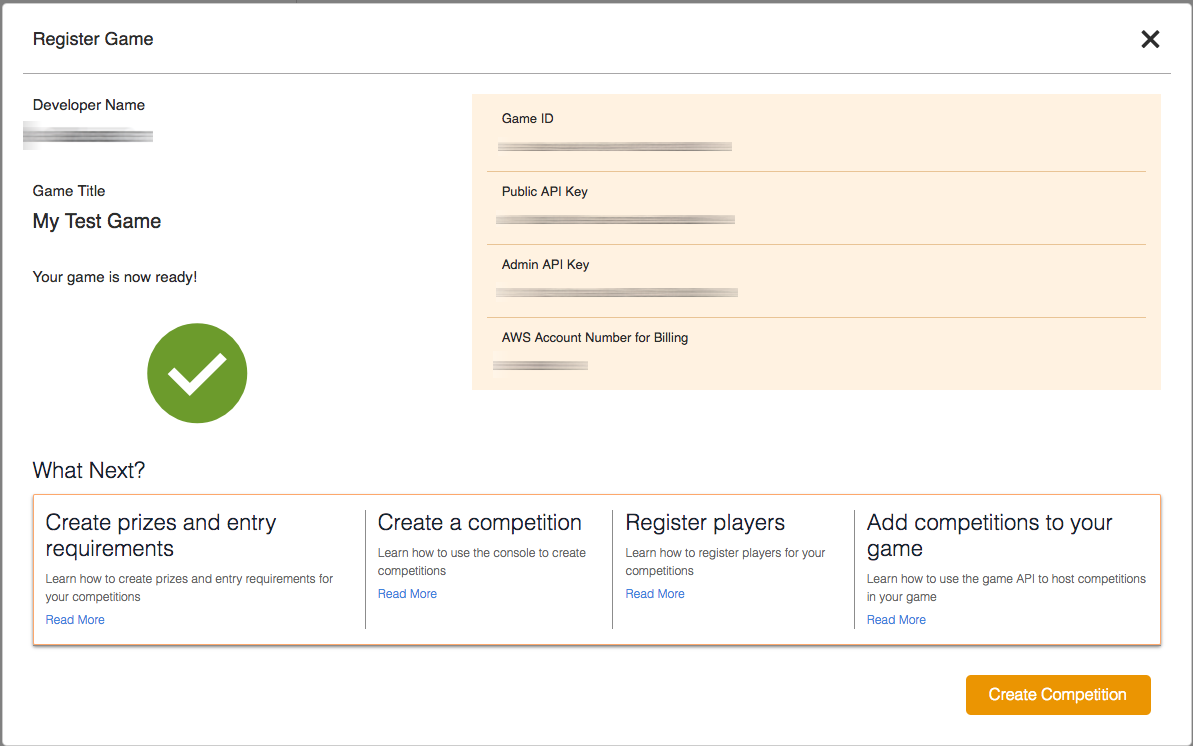
NOTE: If you forget your GameOn Public API Key, you can always retrieve it from the GameOn Registered Games page and by clicking "Details" next to your game in question.
Installing the Skills GameOn SDK
To install the Skills GameOn SDK with NPM, use:
npm install @alexa-games/skills-gameon-sdkTutorials
Simple Week-Long Tournament
In this tutorial, you'll set up a simple, week-long tournament in the GameOn developer console. Then, you'll learn how to interact with that tournament using the Skills GameOn SDK so that your players can enter it, submit scores to it, and get the leaderboard for it. Specifically, you'll step through how to:
- Set up a Competition through the GameOn developer console.
- Use the Skills GameOn SDK to:
- Register a New Player with GameOn.
- Authenticate the Player.
- Enter the Player into the Tournament.
- Submit the Player's Score for the Match.
- Reenter the Player into the Tournament's Match.
- Get the Leaderboard for the Match.
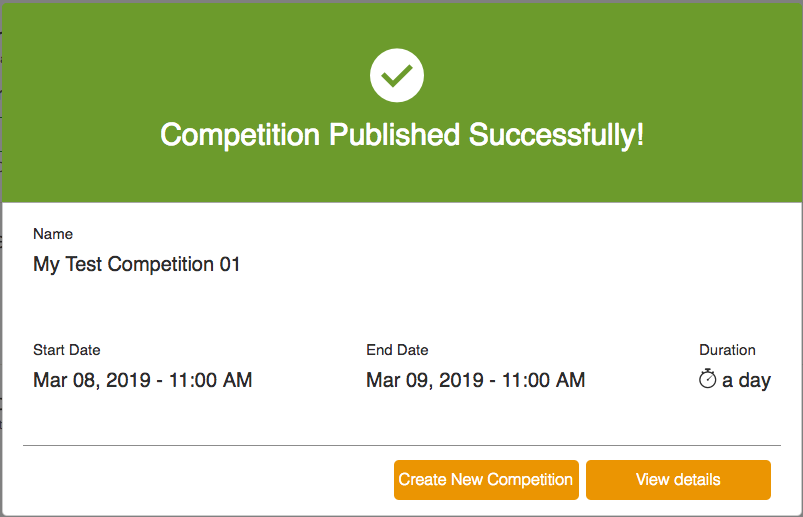
Set up a Competition
Go to Competition Settings
and select Create Competition.
NOTE: For this tutorial, use the following settings:
- Competition Name: Any arbitrary name.
- Start Date: Accept the default.
- End Date: Set this to one week from the start date. (For a persistent leaderboard, you can set this to 100 years out.)
- All Other Settings: Accept the defaults.
Once the competition has been created, select "View details".
NOTE: If you receive an error while creating the competition, your developer console session may have timed out. Try refreshing the page and trying again.
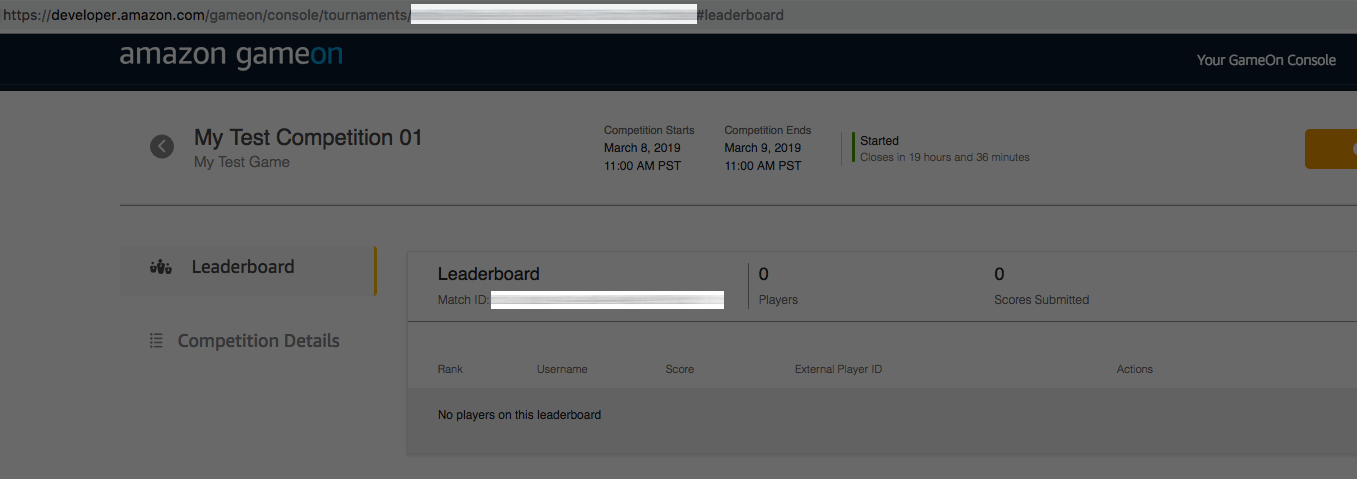
Select Leaderboard.
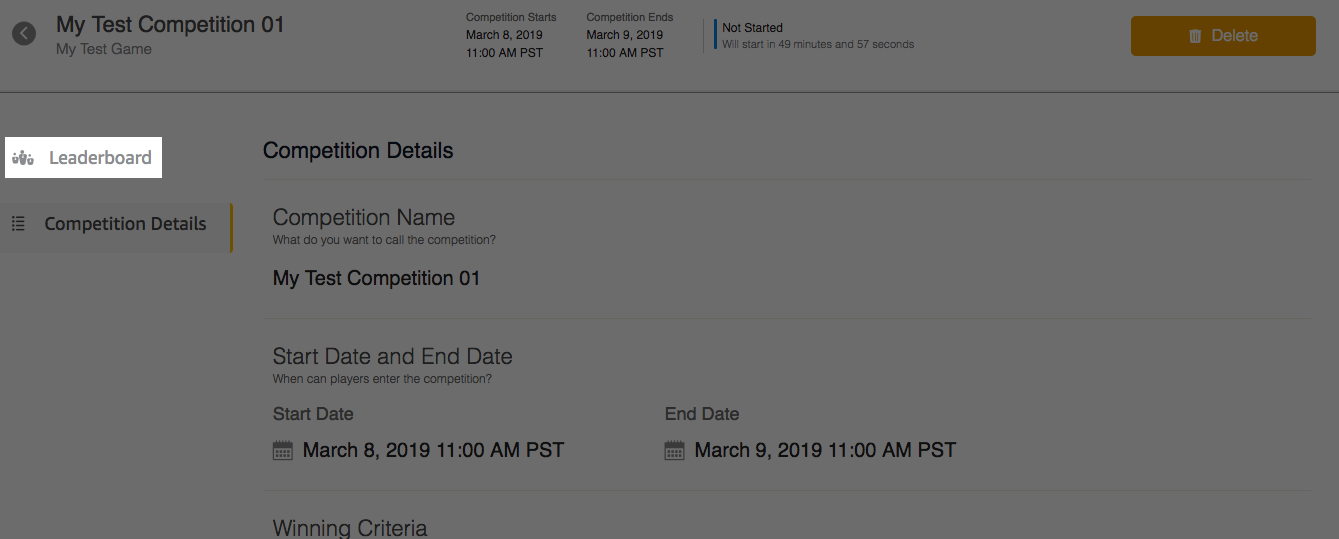
Note the Tournament ID and the Match ID. You will need them so that your players
can enter the tournament, reenter the tournament's match, submit scores to the match,
and to retrieve the match's leaderboard. The Tournament ID can be found in the URL.
For recurring tournaments, you will need to use the SkillsGameOnApiClient.getTournamentsByTitle
method since the Tournament ID changes on each recurrence.
Register and Authenticate a New Player
For each new user of your Alexa skill, you must first register & authenticate them with the GameOn service before they can enter tournaments, enter matches, and submit scores.
The typical workflow is:
- Register a new Player with GameOn. A Player can be considered new when:
- a new user is launching your game for the first time,
- your game is setting up a local multiplayer tournament, and/or
- any other scenario where a new player is joining the game.
- Authenticate the Player to obtain a session token for communicating with the GameOn API whenever (a) the previous session token has expired, or (b) it's a new Player.
import { SkillsGameOnApiClient } from '@alexa-games/skills-gameon-sdk';

const client = new SkillsGameOnApiClient();

const player = await client.initializeNewPlayer({
    gameApiKey: '<GAMEON_PUBLIC_API_KEY>', // Your Public API Key you receive when you register your game with GameOn.
    appBuildType: 'development' // GameOn API requires either 'development' or 'release', but it's only used for their metrics.
});
The method will return a Player with structure:
{
    "externalPlayerId": "<GAMEON_PLAYER_ID>",
    "playerToken": "<GAMEON_PLAYER_TOKEN>",
    "sessionId": "<GAMEON_PLAYER_SESSION_ID>",
    "sessionApiKey": "<GAMEON_PLAYER_SESSION_API_KEY>",
    "sessionExpirationDate": "<GAMEON_PLAYER_SESSION_EXPIRATION_DATE>"
}NOTE: If you are interested in creating a player with a profile (name, color, and avatar), you can use the
#initializeNewAugmentedPlayermethod that is available with theSkillsGameOnApiClient. This method is similar to#initializeNewPlayerexcept that it also takes in an additionalPlayerProfileGeneratoras a parameter. To instantiate aPlayerProfileGenerator, please see the section How to Handle Player Names. A success messageNOTE: For the rest of this tutorial, when you see
player, it is referring to the player object that we created in this step.NOTE: We also provide a convenience method for refreshing your Player's GameOn session. The call will looking something like:
await client.refreshPlayerSession({
    gameApiKey: '<GAMEON_PUBLIC_API_KEY>', // Your Public API Key you receive when you register your game with GameOn.
    appBuildType: 'development', // GameOn API requires either 'development' or 'release', but it's only used for their metrics.
    player: player
});
Enter the Player into the Game's Tournament
A player must first enter the Tournament before they can enter matches and submit their scores.
await client.enterTournamentForPlayer({
    tournamentId: '<GAMEON_TOURNAMENT_ID>', // The Tournament ID that is associated with your game.
    player: player
});
Enter the Player into the Tournament's Match
Before a player can submit a score to a match, they must first join said match. To do that, call:
await client.enterMatchForPlayer({
    matchId: '<GAMEON_MATCH_ID>', // The Match Id that is associated with your tournament.
    player: player
});
Submit the Player's Score
Now the player can submit their score to the tournaments's match, like so:
await client.submitScoreForPlayer({
    matchId: '<GAMEON_MATCH_ID>',
    submitScoreRequest: { score: 10 },
    player: player
});NOTE: You must always enter the match before submitting a score.
Get the Leaderboard
To retrieve just the top scorers on the leaderboard, you can call:
await client.getMatchLeaderboardForPlayer({
    matchId: '<GAMEON_MATCH_ID>',
    player: player
});
The method will return a GetMatchLeaderboardResponse with structure:
{
    leaderboard: [
        {
            externalPlayerId: "<GAMEON_PLAYER_ID_1>",
            playerName: "player278",
            score: 70,
            rank: 1
        },
        {
            externalPlayerId: "<GAMEON_PLAYER_ID_2>",
            playerName: "player5846",
            score: 50,
            rank: 2
        }
    ],
    leaderboardStat: "points",
    next: "/matches/<GAMEON_MATCH_ID>/leaderboard?limit=2&cursor=<CURSOR_ID>"
}
To get the player's tournament rank and their neighbors on the leaderboard, call:
await client.getMatchLeaderboardForPlayer({
    matchId: '<GAMEON_MATCH_ID>',
    player: player,
    currentPlayerNeighbors: 5 // Note: GameOn will not accept a value <= 0.
});
The method will return a GetMatchLeaderboardResponse with structure:
{
    currentPlayer: {
        externalPlayerId: "<CURRENT_PLAYER_ID>",
        playerName: "player5846",
        score: 50,
        rank: 2
    },
    leaderboardStat: "kills",
    neighbors: [
        {
            externalPlayerId: "<GAMEON_PLAYER_ID_1>",
            playerName: "player278",
            score: 70,
            rank": 1
        },
        {
            externalPlayerId: "<CURRENT_PLAYER_ID>",
            playerName: "player5846",
            score: 50,
            isCurrentPlayer: true,
            rank": 2
        },
        {
            externalPlayerId: "<GAMEON_PLAYER_ID_2>",
            playerName: "player1210",
            score: 20,
            rank: 3
        }
    ]
}
Get the Current Player's Score
To get the current player's score and rank, you can call our convenience method:
await client.getPlayerScore('<GAMEON_MATCH_ID>', player);The method will return a PlayerScore with structure:
{
    matchId: "<GAMEON_MATCH_ID>",
    score: 20,
    rank: 1,
    ordinal: "first"
}
Displaying a Leaderboard with Alexa Presentation Language
This is a tutorial section that illustrates how you can render a leaderboard from your skill onto Alexa devices that have screens. Note that this is just a tutorial and a bootstrapping procedure, so it is not the absolute way to do this.
Since this method uses the Alexa Presentation Language (APL) to render the leaderboards, you must ensure that your skill is configured to support APL by following the instructions here.
The Skills GameOn SDK includes a utility method to render an APL directive that will display your match's leaderboard. This utility is a great starting point for those who want to enhance their skill with visual elements.
To show the top 5 scores of a match, first call the getMatchLeaderboardForPlayer method in the SkillsGameOnApiClient to get your leaderboard data. Pass the data into this function to generate APL.
The resulting leaderboardDirective is a well-formed Alexa.Presentation.APL.RenderDocument directive that you can send in your skill's response.
const client = new SkillsGameOnApiClient();
const leaderboard = client.getCombinationLeaderboards({ player, matchId: '<GAMEON_MATCH_ID>', topScoresLmit, playerNeighborsLimit });
const renderOptions = { backgroundImageUrl: '<IMAGE_URL>' };
const playerProfileGenerator = PlayerProfileGeneratorBuilder.getGenerator({ avatarBaseUrl: '<AVATAR_BASE_URL>' });
const leaderboardDirective = renderLeaderboard(player, leaderboard, renderOptions, playerProfileGenerator); // #renderLeaderboard is part of the @alexa-games/skills-gameon-sdk package.
How to Handle Player Names
Optional: Player Profile Generation
The Skills GameOn SDK includes mechanisms to generate a unique name and avatar for your players. These two values together are referred to as the player profile.
The player name is a string such as "Jim from Seattle" or something random such as "Grumpy Kowolla." The avatar is a URI that references an image that you previously generated and hosted on S3 or another website.
The simplest way to create a player profile is with an instance of PlayerProfileGenerator which you retrieve from PlayerProfileGeneratorBuilder. For example:
const generator = PlayerProfileGenerator.getGenerator({
    locale: "en-US",
    avatarBaseUrl: "https://s3.us-east-1.amazonaws.com/YOUR_BUCKET_NAME",
    numberOfUniqueAvatars: 50
});
Once you have a generator, get a random profile such as:
const randomProfile = generator.getRandomPlayerProfile();Or a unique but consistent profile such as:
const uniqueProfile = generator.getPlayerProfileFromId(playerId);The generator returns this:
{
    name: "Grumpy Kowolla",
    avatar: "https://example.com/myskillarea/avatars/34.png"
}
Use these properties with other leaderboard APIs to store the generated name. Because the avatar URL cannot be stored with the leaderboard, use generator.getPlayerProfileFromId(playerId) to get a consistent avatar for that player.
If you don't need both an avatar URL and a name for your skill, you may generate these properties separately using PlayerAvatarUriGenerator and PlayerNameGenerator respectively.
Of course, you can create names and avatars using other mechanisms of your choosing.
Name Generation
You may use PlayerNameGenerator to generate just a name for your player such as:
const generator = PlayerNameGeneratorBuilder.getGenerator('en-US');

// Generate consistent name from hash.
const hash = getHash(id);
const name1 = generator.getFromHash(hash);

// Generate consistent name from id.
const name2 = generator.getFromId(id);

// Generate random name.
const name3 = generator.getRandom();
The first parameter, locale, indicates the preferred language of the word list. Currently only English words are selected regardless of the provided locale. This gives us the ability to add support for new languages in the future without changing the API signature.
Avatar URI Generation
You may use PlayerAvatarUriGenerator to generate just the avatar URI for you player.
const generator = PlayerAvatarUriGeneratorBuilder.getGenerator({
                    avatarBaseUrl: "https://example.com/myskillarea/avatars",
                    numberOfUniqueAvatars: 50
                });

// Generate consistent avatar image from hash.
const hash = getHash(id);
const uri1 = generator.getFromHash(hash);

// Generate consistent avatar image from id.
const uri2 = generator.getFromId(id);

// Select a random avatar image.
const uri3 = generator.getRandom();
Avatar Generation
The SDK includes a CLI tool that demonstrates one way to generate images that you could use as avatars. You will likely want images unique to your skill and branding, but these images can serve as placeholders or just as illustration.
npm install gridy-avatars convert-svg-to-png
npx avatar-maker
This will generate 500 avatars in a directory called avatars. Use the --help option for other options:
npx avatar-maker -- --help

This CLI tool will generate a 100x100 pixel image that can be used as a player avatar.
By default, the script will create 500 images in the avatars directory.
You may specify different values in the first two parameters of the script. For example:

       npx avatar-maker -- 50 avatar1

Will create 50 images in the avatar1 directory.
Here is the output of the script:
npx avatar-maker

Generating 500 avatars in directory 'avatar'
Creating avatars
Saving file ${CWD}/avatars/0.png from 756603
Saving file ${CWD}/avatars/1.png from 114505
...
Saving file ${CWD}/avatars/498.png from 772043
Saving file ${CWD}/avatars/499.png from 361160
Best Practices
GameOn API Secret Management
Rather than exposing your GameOn Public API key in cleartext in your source code, we strongly recommend using a service such as AWS Key Management Service to keep your key secret & safe.
There are several strategies to do this, but we're only going to highlight two.
NOTE: The following tutorials assume that you're using AWS Lambda to host your skill.
Using Environment Variable Encryption
This strategy is much simpler than the next. It's the preferred one if you don't have any plans to share secrets with other developers, or if you don't have plans to set up any kind of multi-stage pipeline.
When you create or update Lambda functions that use environment variables, AWS Lambda encrypts them using the AWS Key Management Service. When your Lambda function is invoked, those values are decrypted and made available to the Lambda code.
Check out the AWS documentation on Environment Variable Encryption for instructions on how to use this strategy.
Using an Encrypted Secrets File
This strategy will create an encrypted secrets file. This can be fully automated (no reason to abbreviate environment variables) and can be safely checked into source code and shared between developers.
In this section we'll:
- Create a KMS key with the AWS CLI.
- Encrypt your GameOn API secret file with the AWS CLI.
- Upload your encrypted secret file to AWS S3 with the AWS CLI.
- Decrypt your secret file in your skill at runtime with our tool.
1. Create the AWS KMS Key
The AWS KMS key is necessary to encrypt/decrypt files with the AWS KMS service.
Create the AWS KMS Key Policy File
We need to define a KMS Key policy that gives your skill's Lambda function access to the AWS KMS key to perform the decryption operation at runtime.
Create a file called kmsPolicy.json, and put the following inside:
{
  "Id": "key-policy-gameon",
  "Version": "2012-10-17",
  "Statement": [
    {
      "Sid": "Enable IAM User Permissions",
      "Effect": "Allow",
      "Principal": {
        "AWS": "arn:aws:iam::YOUR_SKILL_AWS_ACCOUNT_ID:root"
      },
      "Action": "kms:*",
      "Resource": "*"
    },
    {
      "Sid": "Allow standard access",
      "Effect": "Allow",
      "Principal": {
        "AWS": "arn:aws:iam::YOUR_SKILL_AWS_ACCOUNT_ID:user/YOUR_SKILL_MANAGEMENT_IAM_USER_NAME"
      },
      "Action": [
        "kms:Encrypt",
        "kms:Decrypt",
        "kms:ReEncrypt*",
        "kms:GenerateDataKey*",
        "kms:DescribeKey"
      ],
      "Resource": "*"
    },
    {
      "Sid": "Allow decrypt-only",
      "Effect": "Allow",
      "Principal": {
        "AWS": "arn:aws:iam::YOUR_SKILL_AWS_ACCOUNT_ID:role/YOUR_SKILL_LAMBDA_FUNC_EXECUTION_ROLE"
      },
      "Action": "kms:Decrypt",
      "Resource": "*"
    }
  ]
}
Be sure to replace the following stubs with your values:
YOUR_SKILL_AWS_ACCOUNT_ID: The AWS Account ID where the skill is deployed.YOUR_SKILL_MANAGEMENT_IAM_USER_NAME: The name of the AWS IAM User that is deploying the skill's stack.YOUR_SKILL_LAMBDA_FUNC_EXECUTION_ROLE: The execution AWS IAM Role for your skill's Lambda function.
Create the AWS KMS Key with the AWS CLI
Run the following AWS CLI commands:
-> aws kms create-key --policy file://kmsPolicy.json --profile YOUR_SKILL_MANAGEMENT_IAM_USER_NAME --region us-east-1

{
    "KeyMetadata": {
        "AWSAccountId": "YOUR_SKILL_MANAGEMENT_IAM_USER_NAME",
        "KeyId": "YOUR_AWS_KMS_KEY_ID",
        "Arn": "arn:aws:kms:us-east-1:YOUR_SKILL_AWS_ACCOUNT_ID:key/YOUR_AWS_KMS_KEY_ID",
        "CreationDate": 1552500200,
        "Enabled": true,
        "Description": "",
        "KeyUsage": "ENCRYPT_DECRYPT",
        "KeyState": "Enabled",
        "Origin": "AWS_KMS",
        "KeyManager": "CUSTOMER"
    }
}

-> aws kms create-alias --alias-name alias/GameOnApiKey --target-key-id YOUR_AWS_KMS_KEY_ID
2. Encrypt your GameOn API Secret
Create the Cleartext File
Create the file cleartext.json that has a JSON structure with your
GameOn Public API Key inside. Like this:
{
    "gameOnApiKey": "YOUR_GAMEON_API_KEY"
}
Encrypt the Cleartext File with the AWS CLI
-> aws kms encrypt \
--key-id YOUR_AWS_KMS_KEY_ID \
--plaintext fileb://cleartext.json \
--query CiphertextBlob \
--output text \
--profile YOUR_SKILL_MANAGEMENT_IAM_USER_NAME \
--region us-east-1 \
| base64 --decode > encrypted.txt
This will output an encrypted.txt file.
3. Upload Encrypted GameOn API Secret
Now you'll upload your encrypted secret to AWS S3 so that your skill can refer to it when using the AWS KMS service at runtime.
Create AWS S3 Bucket with the AWS CLI
You'll need an AWS S3 Bucket to hold your encrypted file.
-> aws s3 create-bucket --bucket YOUR_SKILL_NAME --profile YOUR_SKILL_MANAGEMENT_IAM_USER_NAME --region us-east-1

{
    "Location": "/YOUR_SKILL_NAME"
}
Upload the Encrypted File to S3 with the AWS CLI
-> aws s3 cp encrypted.txt s3://YOUR_SKILL_NAME/gameon/secret.txt --profile YOUR_SKILL_MANAGEMENT_IAM_USER_NAME --region us-east-1

upload: ./encrypted.txt to s3://YOUR_SKILL_NAME/gameon/secret.txtNOTE: Your file's URL will be https://s3.amazonaws.com/YOUR_SKILL_NAME/gameon/secret.txt. Remember it because you'll need it for the next step.
4. Decrypt your GameOn API Secret
Now, in your skill, it's time to decrypt your GameOn API Secret so that you can make calls to the GameOn service. We've created a tool for you to use in your skill's code, and now we'll show you how to use it.
Decrypt your GameOn API Secret with our Tool
In your skill's code, you can use our KmsDecryptionHelper to get your
GameOn Public API Key. Here's an example of its use in TypeScript:
import { KmsDecryptionHelper } from '@alexa-games/skills-gameon-sdk';

async function getGameOnApiKey(): Promise<string> {
    const secretFileUrl = 'https://s3.amazonaws.com/YOUR_SKILL_NAME/gameon/secret.txt';
    const kmsKeyRegion = 'us-east-1';

    const secrets = await KmsDecryptionHelper.getSecrets(secretFileUrl, kmsKeyRegion);

    return secrets['gameOnApiKey'];
}
And that's it. You are now safely managing your GameOn Public API Key.
Samples
Alexa Skill: Word Word
Word Word is a fun tongue-twisting challenge. When playing, Alexa will give you a silly, random word. Simply repeat the word as many times as you can as fast as you can. Then see how you rank against the daily leaderboard! The Word Word skill is live, so you can enable it on your Alexa devices and play it today. More information about the skill is also on the Alexa Skills Store.
Code Sample: Word Word Lite
Word Word Lite is a bare-bones sample skill inspired by the official 'Word Word' game. The code sample can be found in in the samples directory.
To deploy this sample in your Alexa developer account, you will need to complete following steps:
- Use the ASK CLI to set up a new skill project . Check out the ASK CLI for instructions on how to setup a new custom skill project.
- Copy the files under the src folder to the
lambda/custom/folder in your new custom skill project. - Copy the
skill.jsonand the models folder to your custom skill. - Set up environment variables for the variables defined in the
src/settings.jsfile. Refer to the section Using Environment Variable Encryption for instructions on how to set up environment variables for your Lambda function. - Build the skill and deploy using the ASK CLI.
Skill Flow
Launch
Skill will launch and check if the player has been created. If the player has not been created it will register a new player with GameOn. Otherwise, the skill will check if it needs to refresh the player's session with the GameOn services.
Challenge
Immediately after launch, the game will move to the challenge state where it gets the challenge word and gives the player instructions. The user utterance is mapped to the PLAY_GAME_INTENT which has 52 slot values. An example of this model can be found at
samples/word-word-lite/models/en-US.json.Result
The score is calculated by the skill code and submitted to GameOn. Updated leaderboards are requested from GameOn, parsed and returned to the user.
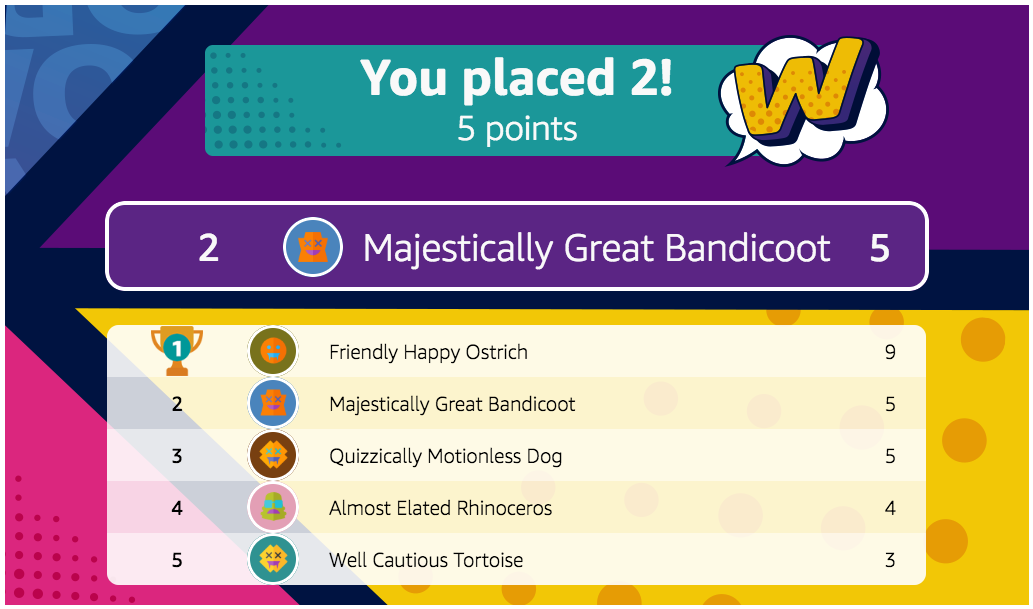
Leaderboards
Here some screenshots of Word Word's leaderboard. It uses the Alexa Presentation Language (APL) for rendering, and GameOn for the player data.
Development
Lerna
This repository uses Lerna, a tool for managing projects with multiple packages.
Link: https://lernajs.io/
Bootstrapping
Clone the repository and run npm install. This will install dependencies and bootstrap the Lerna project.
Building
To build every package in this project, go to the root of the repository and run npm run build.
Testing
To test every package in this project, go to the root of the repository and run npm run test.
Documenting
The documentation is generated from doc comments with TypeDoc. Comments support Markdown format, which means full examples and links can be included.
Generating the Docs
From the root of the project, run npm run document